Sunday, December 20, 2009

Visit with Santa

So far this year with Santa and 2 kids has gone way better than last year! Check that out here!!! We were going to take the kids to see Santa at the mall, but that place is always just so crowded and rushed. Well every year we have a tradition of going to Chicago to see the windows at Marshall Fields (oh, sorry Macy's, whatever, it will always be Marshall Fields to me!!), and then we head over to Daley plaza for a German Christmas village. So this year we thought we would take the kids to see Santa up there for a change. It was great!!! There was a decorated, interactive line for the kids to wait in. It really helped get the kids even more excited to see the big man! The workers helping with the line were great too, they would talk to the kids, and ask them questions. Then we got ushered into a room with just us and Santa. Both kids sat on his lap and told him what they wanted. (By the way, L asked for "Big trucks", and D asked for " a pretty dress".) He gave each kid a button and out we went. D was so very shy when talking to him, but at least she didn't cry. (Which, if you know D, she is anything but shy! The girl doesn't stop talking!!)

So, I am doing Christmas cards, they will be a bit late, but here is the picture. I hope everyone out there has a very Happy Holiday season, and a fantastically Happy New Year! I do have more cookies to bring you, I just don't have the pictures up loaded yet. I promise to do at least until the end of the year, and then I think it will just be a cookie of the month. I really do need to get back to what the blog was about. My family. So thanks so much for everything!


Merry Christmas from Hippie Mama Kelly, Adam, L and D!!!

May your days be filled with fun and joy!

Cookie of the Week!-Gingerbread men

Wow, am I behind. Sorry about that out there. Well you all know how this time of year can get just crazy, and over here it has. I swear there is something everyday. And the kids and I were on the road on and off for the last 4 days straight. Yikes! And it's not even Christmas yet!

Well, I have never made Gingerbread cookies before, and at Adam's urging we did. I'm sorry that I don't have any pictures of them, but they did turn out really fun. Even the kids ate them!

So here is the recipe that we used. The trick is to keep the dough cold until you are ready to use it. We found that this worked great. Oh and to make sure that your cookie cutter is properly floured. You don't want to do through all that work and then have it stick when you cut it out. We just decorated them with a simple powdered sugar and milk icing. It did run a bit, but pretty much stayed in place. All right so when I went back to find the recipe we used, I couldn't find it. But this one was very similar!

Happy baking!

  • 3 1/4 cups sifted all-purpose flour
  • 3/4 teaspoon baking soda
  • 3/4 cup (1 1/2 sticks) unsalted butter (room temperature, softened)
  • 1/2 cup dark-brown sugar, packed
  • 1 Tbsp ground ginger
  • 1 Tbsp ground cinnamon
  • 1/2 teaspoons ground cloves
  • 1/2 teaspoon ground nutmeg
  • 1/4 teaspoon finely ground black pepper
  • 1/2 teaspoon salt
  • 1 large egg
  • 1/2 cup unsulfured molasses

1 In a large bowl, sift together flour, baking soda, and spices. Set aside.

2 In an electric mixer fitted with the paddle attachment, cream the butter. Add sugar and beat until fluffy. Mix in eggs and molasses. Gradually add the flour mixture; combine on low speed. (You may need to work it with your hands to incorporate the last bit of flour.) Divide dough in thirds; wrap each third in plastic. Chill for at least 1 hour or overnight. Before rolling out, let sit at room temperature for 5-10 minutes. If after refrigerating the dough feels too soft to roll-out, work in a little more flour.

3 Heat oven to 350°. Place a dough third on a large piece of lightly floured parchment paper or wax paper. Using a rolling pin, roll dough 1/8 inch thick. Refrigerate again for 5-10 minutes to make it easier to cut out the cookies. Use either a cookie cutter or place a stencil over the dough and use a knife to cut into desired shapes. Press raisins, chocolate chips, or candy pieces in the center of each cookie if desired for "buttons".

4 Transfer to ungreased baking sheets. Bake until crisp but not darkened, 8 to 10 minutes. Remove from oven. Let sit a few minutes and then use a metal spatula to transfer cookies to a wire rack to cool completely. Decorate as desired.

Makes 16 5-inch long cookies.

Sunday, December 6, 2009

Cookie of the Week!- Starbucks Peppermint Brownie

Okay so I just had to try this. It is my all time favorite holiday treat!!! Now, I got the recipe here but I recommend using a 9x13 pan instead. I found that using the smaller pan the brownie's were too large and the bottom started to dry out before the middle was done. Overall though, a big plus!!!!


Brownies

Peppermint Buttercream Frosting

  • 1/3 cup butter, softened
  • 1 1/2 cups powdered sugar
  • 1 tablespoon milk
  • 1/4 teaspoon peppermint extract
  • 1/4 teaspoon vanilla extract

Chocolate Frosting

  1. Preheat oven to 325. Then prepare a 9x9 inch baking dish by spraying lightly with non-stick cooking spray. Cut a piece of parchment paper to the width of the bottom of your pan but long enough to extend over the edge of the right and left sides of the pan.
  2. Sift brownie mix to eliminate any clumps. Then add melted butter, water eggs and 1/4 teaspoon of peppermint extract. Mix by hand just until dry ingredients are incorporated.
  3. Pour into prepared pan. Bake according to package directions. Let cool.
  4. Beat together cup powdered sugar and 1/2 cup softened butter. Mix in another 1/2 cup powdered sugar, then add 1 tablespoon milk and peppermint and vanilla extracts. Spread frosting evenly over the top. Place brownies in fridge to firm up frosting.
  5. Bring 1/3 cup milk and 1/4 cup butter almost to a boil over medium heat. Pour chocolate chips into a heat-safe bowl. Pour milk mixture over the top and let sit for 5 minutes. Add 1 teaspoon vanilla and whisk until smooth. Use an electric mixer to beat in 1 cup powdered sugar until frosting is smooth. This will make more than you need, so remove 1/4-1/3 cup frosting and reserve for another use.
  6. Spread chocolate frosting over the white frosting on the brownies.
  7. Place back in fridge for about an hour to firm up frosting. Remove brownies from pan and slice into 9 pieces.

Saturday, November 28, 2009

Cookie of the Week!- Starbucks Cranberry Bliss Bar


Now if you are a fan of Starbucks then you know that it is the time for the Bliss bar and the peppermint brownie. The best time of the year!!! I had a request to make the bliss bar from a former co-worker and friend (bet you didn't know that I worked for Starbucks for years, until I had L). I told to let me poke around some and see what I could find. Well I found a great recipe for them. I got it here, and I have to say that they are pretty close to the real thing. These are a bit more cakey then the actual bliss bar, but way cheaper to make them yourself. I think in the store right now they are $2.25 a piece, and to make this it would probably cost a whopping $5-7! So I just had to make these for Thanksgiving! I actually made 2 batches over these last 2 days, and they have been a hit. So I highly recommend making these, whether you are a huge fan of the original Bliss bar or just really like cranberry, white chocolate, and cream cheese. You must make these!!! Next up, Starbucks Peppermint Brownie!


Cake

  • 1 cup butter , softened
  • 1 1/4 cups light brown sugar, packed
  • 3 eggs
  • 1 1/2 teaspoons vanilla or orange extract
  • 1 teaspoon ground ginger
  • 1/4 teaspoon salt
  • 1 1/2 cups all-purpose flour
  • 3/4 cup diced dried cranberries
  • 6 ounces white chocolate, cut into chunks

Frosting

  • 4 ounces cream cheese, softened
  • 3 cups powdered sugar
  • 4 teaspoons lemon juice or 2 teaspoons orange extract
  • 1/2 teaspoon pure vanilla extract
  • 1/4 cup diced dried cranberries

Drizzled Icing

  • 1/2 cup powdered sugar
  • 1 tablespoon milk
  • 2 teaspoons vegetable shortening
  • orange zest, garnish (optional)
  1. Preheat oven to 350 degrees.
  2. Beat butter and brown sugar with an electric mixer until smooth. Add eggs, vanilla, ginger, and salt; beat well.
  3. Gradually mix in flour until smooth.
  4. Mix 3/4 cup diced dried cranberries and white chocolate into the batter by hand.
  5. Pour batter into a well-greased 9x13-inch baking pan and spread evenly.
  6. Bake for 30 to 35 minutes or until cake is light brown on the edges.
  7. Let cool.
  8. Frosting: combine cream cheese, powdered sugar, lemon juice and vanilla with an electric mixer until smooth.
  9. When the cake has cooled, spread frosting over the top of cake.
  10. Sprinkle top with diced cranberries.
  11. Icing: Whisk powdered sugar, milk, and shortening.
  12. Drizzle icing over cranberries in a sweeping motion or use a pastry bag with a fine tip.
  13. Allow cake to sit for several hours, then slice the cake lengthwise (the long way) through the middle.
  14. Slice the cake across the width three times making a total of eight rectangular slices.
  15. Slice each of those rectangles diagonally creating 16 triangular slices.

Monday, November 23, 2009

Cookie of the Week!- Peppermint Whoopie Pies


This picture does not do them justice! These taste like a little bit of heaven all wrapped up in your mouth. Yum!

Sorry I am a little behind posting this, but it was a busy weekend and the internet was very patchy. So I made the normal whoopie pies when I headed up to visit my friend Maryjane, and boy were those super yummy. But we thought they would taste really yummy with peppermint in the filling, and of course as we all know if you flavor anything peppermint, you must color it pink! I used the America's Test Kitchen recipe and changed the filling just a touch.

Whoopie Pies
cakes:
2 cups flour
1/2 cup dutch-processed cocoa
1 tsp baking soda
1/2 tsp salt
8 tbsp (1 stick) unsalted butter, softened
1 cup packed light brown sugar
1 large egg
1 tsp vanilla extract
1 cup buttermilk

filling:
12 tbsp butter, softened
1 1/4 cups powdered sugar
3/4 tsp. peppermint extract
a few drops of red food coloring
1/8 tsp salt
2 1/2 cups marshmallow creme

1. For the cakes: line 2 baking sheets with parchment. whisk the flour, cocoa powder, baking soda, and salt together in a medium bowl.

2. In a large bowl, beat the butter and brown sugar until light and fluffy. Add the egg and vanilla.

3. Slowly mix in half of the flour mixture into the butter/sugar mixture, followed by half of the buttermilk, repeat with half of the remaining flour and the remaining buttermilk. Add the remaining flour mixture until combined.

4. Scoop generous 1/4 cup mounds of batter onto the prepared baking sheets, about 2" apart. Bake the cakes until they spring back when pressed, 15-18 minutes. Let cool completely before removing from baking sheets. (Modification: We didn't do 1/4 cup, we thought this would be HUGE so we used a cookie batter scoop and made them the size of regular cookies)

5. For the filling: Beat the butter and powdered sugar together with a mixer until light and fluffy. Beat in vanilla and salt. Beat in the marshmallow creme until incorporated.

6. To serve, spread 1/3 cup filling (or less, if using our mods) evenly over the bottom of the cake and then make a sandwich by pressing the bottom of another cake onto the filling. Repeat with the remaining cakes and filling.

Friday, November 13, 2009

Cookie of the Week!-Burt's Oatmeal Blueberry bars

I wanted to do something in honor of Sesame Street's 40th anniversary, so I tried to come up with something along those lines. Well then I remembered this really neat kids cookbook that I got free from WIC last month. It's called "C is for Cooking" and is a kids Sesame Street cookbook. I threw it open to find Burt's Best Blueberry Oatmeal Bars. What could be better. Plus I had everything in the house already. Score! So here it is:

1 1/2 cups all purpose flour
1 tsp. cinnamon
1 tsp. baking soda
1/2 tsp. salt
1 cup packed brown sugar
1/2 cup granulated sugar
1 stick butter, softened
1/2 cup vegetable oil
2 eggs
1 tsp. vanilla
3 cups uncooked old fashioned oats
2 cups fresh blueberries

1. Preheat the oven to 350. Line a 13 x9 baking pan with aluminum foil. Lightly grease the foil with nonstick cooking spray or vegetable oil.
2. In a small bowl, whisk together the flour, cinnamon, baking soda, and salt until well mixed.
3. In a large bowl with an electric mixer at medium speed, beat together the brown sugar, granulated sugar, and butter until fluffy. Beat in the oil, eggs, and vanilla. With a wooden spoon, mix in the flour mixture until blended. Stir in the oats and blueberries.
4. Use a rubber spatula to spread the batter evenly in the pan.
5. Bake until golden brown and a toothpick inserted in the center comes out clean, 30 to 35 min. Transfer the pan to a wire rack to cool completely. Lift by the foil from the pan and cut into 24 bar cookie.


It's my birthday!

It has been party central over in my house this week. You see, this last Wednesday (11-11) I turned 30! AAAAHHHH, 30! Actually I am totally fine with that age. But we have been partying it up for a week straight now. It also happens to be my friend Diane's birthday also, so we have had fun sharing our birthday! It started last Friday when my friend Amanda took me out for dinner. Saturday Diane and I hosted a dinner birthday party with a few local friends. What a blast! My mom took the kids for the weekend so we could just have fun. Tuesday my dad and brother came out to visit bringing cards, flowers, and a cheesecake. They of course also took us all out to eat. Famous Dave's BBQ here we come. Wednesday was my actual birthday and my mom came out during the day. She brought presents, and a caramel cake. She took the kids and I out for lunch for Five Guys. Hurray! Then Adam got home and made a pear upside down cake. He was going to take us out for dinner to Red Robin back in our old city. I couldn't understand why he was making us drive an hour away when there was one just 5 min from our house. Well when we got there I understood. He had contacted all our friends that live out that way and had a surprise dinner ready and waiting for me. It was great to see everyone, and what a great surprise! Last night I got to go on a mini shopping spree at Target with a gift card I had gotten, and came home to split a bottle of wine with the hubby! Right now I am packing my bags, and in the morning I will be heading on a little road trip of my own. I am getting a rental car and going to visit my friend Maryjane in Wisconsin! We have never met in real life but have none each other for almost 3 years now. Go check out her blog if you haven't already. She has amazing stuff going on over there. And she is planning on us making some whoppie pies! Can't wait! And don't worry, I will take tons of pics and blog about it next week when I get back.


This is the cake I made for our dinner party on Saturday. It's a black forrest cake from the America's Test Kitchen Family Baking Book. If you don't have this book, you must get it. It is amazing!


The girls. The 2 birthday girls are in the middle!

Thursday, November 5, 2009

Cookie of the Week!-Pumpkin Cookies with Brown Butter Icing


Can you tell where Adam grabbed a cookie of the plate?

So this week's cookie is from by dear friend Maryjane! No she didn't create this recipe, but she did post it on my facebook page and brought it to my attention. And for that, a big thank you! These are terrific! You really should check out Maryjane's blog too. She does tons of amazing things over there. And I'm really excited to say that next weekend I get to go visit her for the weekend, I will be kid free, and driving a rental car! Hurray for a mini mommy vacation! And now back to the cookies!

These are from Martha Stewart again. I sometimes can't stand the lady, but damn it if she has some great ideas. Here is a link to the recipe, but I will also post it below to make things easier for you.


  • FOR THE COOKIES
  • 2 3/4 cups all-purpose flour
  • 1 teaspoon baking powder
  • 1 teaspoon baking soda
  • 1 1/4 teaspoons coarse salt
  • 1 1/2 teaspoons ground cinnamon
  • 1 1/4 teaspoons ground ginger
  • 3/4 teaspoon ground nutmeg
  • 3/4 cup (1 1/2 sticks) unsalted butter, softened
  • 2 1/4 cups packed light-brown sugar
  • 2 large eggs
  • 1 1/2 cups canned solid-pack pumpkin (14 ounces)
  • 3/4 cup evaporated milk
  • 1 teaspoon pure vanilla extract
  • FOR THE ICING
  • 4 cups confectioners' sugar, sifted
  • 10 tablespoons (1 1/4 sticks) unsalted butter
  • 1/4 cup plus 1 tablespoon evaporated milk,
  • 2 teaspoons pure vanilla extract

  1. Make cookies: Preheat the oven to 375 degrees. Whisk together flour, baking powder, baking soda, salt, cinnamon, ginger, and nutmeg in a medium bowl; set aside.
  2. Put butter and brown sugar in the bowl of an electric mixer fitted with the paddle attachment. Mix on medium speed until pale and fluffy, about 3 minutes. Mix in eggs. Reduce speed to low. Add pumpkin, evaporated milk, and vanilla; mix until well blended, about 2 minutes. Add flour mixture; mix until combined.
  3. Transfer 1 1/2 cups batter to a pastry bag fitted with a 1/2-inch plain tip (such as Ateco #806). Pipe 1 1/2-inch rounds onto parchment-lined baking sheets, (I used my trusty old ice cream scoop that I use for everything! It worked fantastically!) spacing 1 inch apart. Bake cookies, rotating sheets halfway through, until tops spring back, about 12 minutes. Cool on sheets on wire racks 5 minutes. Transfer cookies to wire racks; let cool completely.
  4. Make icing: Put confectioners' sugar in a large bowl; set aside. Melt butter in a small saucepan over medium heat. Cook, swirling pan occasionally, until golden brown, about 3 minutes. Immediately add butter to confectioners' sugar, scraping any browned bits from sides and bottom of pan. Add evaporated milk and vanilla; stir until smooth. Spread about 1 teaspoon icing onto each cookie. If icing stiffens, stir in more evaporated milk, a little at a time. Cookies can be stored in single layers in airtight containers at room temperature up to 3 days.

Friday, October 30, 2009

Cookie of the Week!- Great Grandma's Honey Cookies

Every since I started this Cookie of the Week, members of my family have told me that I needed to make my Great Grandmother's honey cookies. What no one every said was, here is the recipe! I was under 7 when she died and barely remember her. I visited my grandparents last week with the kids, Adam and my dad. When I told my grandma that I was doing this she said that I should make them also. She was not sure where she put the recipe, but then just a few days later I received this great thank you card from her and in it was the recipe. Oh happy day! I could now make a cookie that generations of women in my family made. So of course I had to run out and buy more honey! I took these out of the oven and smelled that warm cookie smell and instantly it all came back to me. Isn't it weird how that can happen. Suddenly I remember my grandmother making them for my brother and I when we would come to visit. The taste and the smell were all there. So now I'm excited to make these for my kids, and hope one day that they make them as well. I have no idea where she found the recipe, but here it is!

Honey Cookies

1 cup softened butter
1 cup brown sugar
2 eggs
6 tbsp. honey
1 tsp. vanilla
3 1/2 cups sifted flour
2 tsp. baking soda

Mix in order, chill for several hours. Drop by teaspoonfuls on a greased baking sheet or parchment paper. Bake at 350 for 10-12 min. When cool, frost with pastel tinted butterless icing. 7 dozen if using tsp. measure.

Now for those that are not sure what a butterless icing is, I figure it was just milk and powdered sugar until it forms a thin paste. To tint it, just use 1 drop of liquid food coloring and blend until pastel color. My great grandma, and my grandma always made them pink, but I let my kids pick the color and they choose blue.

So I hope you enjoy these as much as my family does!

Wednesday, October 28, 2009

Pumpkin Carving

Now let me start by saying that we now have 9 pumpkins in our house, not including the fun little decorative gourds. But Adam came home from work last Thursday and surprised us with 2 good size pumpkins for the kids to carve. They were soooo excited. So far this year we have painted, used Mr. Potatohead stuff, and had face stickers to decorate pumpkins, but this was the first time for carving this year. We got down to work as soon as they were out of the bag! L and D had a great time pulling the guts out. We examined all the seeds and strings. We have read a really great story about how a pumkin comes from a little white seed, and the path that it takes to grow and become a pumkin. The story is Pumpkin Shivaree by Rick Agran I highly recommend it! The kids told us what shapes they wanted for the face and we helped them cut it out. My mother-in-law had gotten us this really cool Pampered Chef kids knife so the kids can help us in the kitchen, and it worked amazingly with the pumpkins. The kids were able to cut through all by themselves with us just making starter cuts. They had a blast! I just realized that I don't have any pictures of the finished pumpkins. Well I will work on that later. For now just enjoy the process pics!

Miss D watching her brother before she starts

L really digging in

Showing off the pumpkin guts


Not to be outdone!

Asking daddy for help

We did roast out seeds after we were done, and they were super tasty. I'll see if I can find that recipe as well!

Halloween Goodies

This last week has been jam packed with Halloween festivities for the kids. It started with a mom's group Halloween party on Saturday. I made cupcakes. Half were decorated as pumpkins and the other half as bats. I had gotten the idea from this book, and tried my hardest to make them look like the ones in there. I got close, not exactly the same, but I think close. The bat wings were a bit too large and heavy, they pulled the tops off the cupcakes. But you live and learn right? Then Monday we had spooky cupcake decorating with the kids. Basically it was a mess of frosting, candy, and sanding sugar, but the kids had a blast! Then today I hosted a candy corn day at the library. I made triangle sugar cookies, and topped them with royal icing. I was going to use the candy corn cookies as my cookie of the week, but have something else up my sleeve. I was very happy with how they all turned out and will give you the recipe for the cookies and royal icing that I made.

Candy Corn cookies


The bats before the wings

Pumpkins (Tootsie Rolls used as the stem)

Bat with wings (the wings were melted candy melts)


Cut out sugar cookies:


12 tbsp. ( 1 1/2 sticks) unsalted butter, softened
1 large egg yolk
2 cups flour
3/4 cup sugar
1 tsp. vanilla
1/2 tsp. salt

Preheat the oven to 350. Using mixer, beat butter until light and fluffy. Scrape bowl as needed. Add sugar, and beat until combined. Beat in egg yolk, and vanilla, and then flour and salt. Scrape dough onto a piece of wax paper, pat into a disc, and cover with another piece of wax. Roll out dough to 1/4" thick. Cut out with cookie cutters, and then place on an ungreased cookie sheet. Bake until golden brown on the bottom and light golden on edges. (about 15 min) Let cool 5 min, and then transfer onto a wire rack to cool completely.


Royal Icing:
(combined from the joyofbaking.com and Alton Brown recipes)

2 large egg whites

2 teaspoons fresh lemon juice

3 cups (330 grams) confectioners (powdered or icing) sugar, sifted

1 tsp. vanilla extract

In the bowl of your electric mixer (or with a hand mixer), beat the egg whites with the lemon juice. Add the sifted powdered sugar and beat on low speed until combined and smooth. The icing needs to be used immediately or transferred to an airtight container as royal icing hardens when exposed to air. Cover with plastic wrap when not in use. I put them in plastic baggies and piped it onto the cookie.

Monday, October 26, 2009

Cookie of the Week!- Chocolate Caramel Cookie Bars

Again sorry but no pictures. I can tell you that the mom's at the play group REALLY loved these. They are more of a grown up cookie then a kid friendly cookie. They are ooey, and gooey, and taste like a gourmet twix bar. I got this recipe from the November 2009 Martha Stewart Living Magazine. I saw these, and ran out the next day to get the ingredients. You won't be sorry you made these.

For the crust:
4 1/2 ounces (9 tbsp.) unsalted butter, room temperature, plus more for the parchment
1/4 cup packed light brown sugar
1 1/2 cups all purpose flour
1/4 tsp. table salt

For the chocolate caramel:
10 1/2 ounces milk chocolate, chopped (2 cups)
1 1/2 cups granulated sugar
1/4 cup water
3 ounces (6 tbsp.) unsalted butter
1 cup heavy cream
1/2 tsp. table salt
1 tbsp. sea salt

1. Preheat oven to 350. Make the crust: Line a 9" square baking pan with parchment, leaving an overhang on all sides; butter parchment, excluding the over hang. Beat butter and brown sugar on medium speed until pale and fluffy, about 3 min. Add flour and table salt, and beat until just combined.

2. Press dough evenly into pan, and bake until lightly golden browned, about 30 min.

3. Make the chocolate caramel: Place the chocolate in a medium bowl. Heat granulated sugar and water in a small saucepan over medium high heat, washing the sides of the pan with a wet pastry brush to prevent sugar crystals from forming, until amber, 10-12 min. Remove from heat. Add butter, cream, and table salt. Bring to a boil, stirring until smooth. Pour over chocolate. Let stand for 2 min. Stir to combine, and let stand until cool, about 10 min.

4. Pour mixture over crust. Refrigerate at least 4 hours, or overnight. Run knife around edges; lift parchment to remove whole bar from pan. Sprinkle with sea salt. Trim edges, and cut into 16 bars. Bars can be refrigerated for up to 3 days.

Mine turned out very gooey, and the crust was very crumbly and not quite like the picture in the magazine but totally worth it.

Cookie of the Week!- Vanilla Meringue kisses


edit: I did just find the picture of the vanilla kisses. See like I said they got a little too golden brown, but tasted super yummy and melted in our mouths!


Okay so I know I am way behind, and I'm sorry. The good news is that I have still been making these cookies every week, the bad news is that I haven't been able to sit down and blog, and now I have lost the pictures of them. So please bear with me. I promise that this Friday will be back to normal!

So on with the recipe, I got this one from the America's test Kitchen Family Baking Book. If you do not own this, you need to. It has all the info and recipe's you could possibly need or want. They also have great substitutions, and advice for when things go wrong.

The recipe is:

3/4 cup sugar
2 tsp. cornstarch
1/8 tsp. salt
4 large egg whites
3/4 tsp. vanilla extract
1/4 tsp cream of tartar

* Please be aware that they may not turn out if it is a humid day out. So if it is raining, please wait a day or two to try to make these.

1. Adjust the oven rack to the upper middle and lower middle positions and heat the oven to 225 degrees. Line 2 large baking sheets with parchment paper. Combine sugar, cornstarch, and salt in a small bowl.

2. Whip the egg whites, vanilla, and cream of tartar together with an electric mixer on medium low speed until foamy, about 1 min. Increase the mixer speed to medium high and whip the whites to soft, billowy mounds, about 1 min. Gradually whip in the sugar mixture, about 1 min. Continue to whip the whites until they are glossy and form stiff peaks, 1-3 min.

3. Use a spoon or a pastry bag fitted with a plain tip to make 1 1/4 inch wide meringue kisses on the prepared baking sheets, spaced about 1 inch apart. (I just used a ziploc freezer bag and sniped the corner off to pipe the kisses on the baking sheet, and it worked really well!)

4. Bake the meringues for 1 hour, switching and rotating the baking sheets halfway through baking. Turn the oven off and allow the meringues to cool in the oven, about 1 hour. Remove the cookies from the oven and let cool to room temperature before serving, about 10 min.


Now when I made these they turned out a golden brown, and I'm not sure if that is correct. But they tasted super yummy and melted in our mouths. I also tried to make some peppermint, but they did not turn out quite right. The egg whites just didn't want to fluff the right way. I tried twice and each time tried to add the peppermint extract in at different times. Neither helped. Not sure what the problem was, maybe it was too humid. But after the second time I did just pipe the mixture on the baking sheet to see what happened. They still tasted very yummy, the only difference was that they were more button shaped as opposed to a kiss shape. Oh well. Try again, right?

Friday, October 9, 2009

Cookie of the Week!- Peanut Butter and Jelly Thumbprints


Something that I really think is fun about doing this cookie of the week thing is that my friends and family are finding me fun new recipes to try. This one is from my sweet mother-in-law. I have a fantastic relationship with her and really appreciate everything she does. I dropped the kids off on Tuesday for her to watch them for an hour. I had a meeting that I could not take the kids to and she always lets me do that. She had ready for me a new family cookbook that someone on Adam's dad's side put together, a child safe knife that I forgot I mentioned I was looking for, and a recipe pulled out of a Martha Stewart Magazine for me to try out. That made my day! How sweet for her to think, Kelly might like to make this for her blog. Now mind you, I doubt she has ever been to a blog and read something, but very sweet none the less. So here is the Peanut Butter and Jelly Thumbprint cookie recipe from Martha Stewart:


Any jam or jelly can be used. The recipe calls for raspberry jam, but I chose seedless blackberry jam. I hope these go over well, I'm bringing them to a play date this morning.

1 1/4 cup all purpose flour
1/2 tsp baking powder
1/2 tsp baking soda
1/2 tsp salt
3/4 cup smooth peanut butter
1 stick unsalted butter, softened
1/3 cup packed light brown sugar
1/3 cup granulated sugar, plus more for rolling
1 egg
1 tsp pure vanilla extract
1/2 cup raspberry jam

1. Preheat oven to 350. Whisk together flour, baking soda, baking powder, and salt. Beat peanut butter and butter with a mixer on medium speed until smooth. Add sugars, and beat until pale and fluffy. Add egg and vanilla, and beat until incorporated. Reduce speed to low. Add dry ingredients, and mix until combined.

2. Scoop level tablespoons of dough and form into balls. Roll each ball in granulated sugar, and transfer to parchment lined baking sheets, spacing about 2 inches apart.

3. Bake until cookies are puffy, about 10 min. Remove from oven, and make indentation in centers by pressing with the handle end of a wooden spoon. Return to oven, and bake until edges are golden, 6-7 min. more. Transfer sheets to wire racks and let cool completely.

4. Heat jam in a small saucepan, stirring, until loosened, about 30 seconds. (We used the microwave) Spoon about 1/2 tsp into each indentation. Cookies can be stored in a single layer for up to 1 week.

Saturday, October 3, 2009

Cookie of the Week- Oatmeal Butterscotch Cookies!

I don't have a picture of this one either. The pictures just didn't do this cookie justice. I'm also sorry that this is a day late, I've had a crazy week! But I have been enjoying doing the cookie of the week that I now plan on doing it through to the new year. Then I will see if I'm burned out by then.

Last weekend Adam and I had one on one time with each kid. We never get to do that anymore, and D had a fit when daddy left her with mommy. How dare he! So I spent that time with each kid making cookies. D and I made the Peanut Butter Gluten Free cookies, and L went fishing with daddy for the first time. He was so proud, L got 3 nibbles, and daddy got none. And then we switched. Daddy and D went to feed the geese at Notre Dame and L and I made Oatmeal Butterscotch cookies. I got this recipe on the back of a generic package of butterscotch chips a few years ago, and I liked it so much it became a staple in our house.

Both of my kids LOVE to bake with me, but what I have realized these last few weeks, is that it is too hard to do with both at the same time. D doesn't mind helping to dump the ingredients into the bowl, but L has discovered that there is measuring that comes before hand, and he wants to be apart of that. He loves to crack the eggs on the side of the bowl, and he loves to help me pack the brown sugar into the measuring cup. He asks excitedly after each ingredient, "So mom, what's next!" I have even showed them how to scoop, scrape, and squeeze with an ice cream scoop to make even sized cookies. They also know that the oven is very hot, and to not touch, even if it's not on.


Oatmeal Butterscotch Cookies


1 cup butter, softened
1 1/2 cup brown sugar
2 eggs
1 tsp. salt
1 tsp. baking soda
2 cups flour
1 bag butterscotch chips
2 cups oats

Preheat the oven to 350. Cream together the butter, sugar, and eggs. Add the rest of the ingredients. Drop on cookie sheet and bake for 12-15 min.


Pretty easy huh? These come out nice and chewy and not too crunchy. Perfect!

Thursday, September 24, 2009

Cookie of the Week!- Whole Wheat Animal Crackers

This week I tried a whole wheat animal cracker! I gotta say they are alright, cuter than they taste, but not bad. I think they are kind of bland, but they would be perfect for the kids. Adam pulled some chocolate ganache out of the fridge and made cookie sandwiches with them and they were kickin'! Alright so I also can't remember what book I got this recipe out of. So if you know, please let me know! Thanks.


1/2 cup shortening (I used butter because I just don't use shortening!)
1/3 cup milk
3 tbsp. honey
1 cup whole wheat flour
3/4 cup all purpose flour
1/2 tsp. baking powder
1/4 tsp. salt

Heat oven to 350. In large bowl, beat shortening, milk, and honey with mixer on medium speed until blended. Stir in remaining ingredients until well blended.
Divide dough in half. On lightly floured cloth covered surface, roll half dough at a time 1/8 inch thick. Cut with about 1 1/4 - 1 1/2 inch animal shape cookie cutters. On ungreased cookie sheet, place cookies about 1 inch apart.
Bake 6-8 min. or until edges are very light brown. Remove from cookie sheets to cooling rack. Cool completely, about 30 min.


*Now, after mixing it all up it was still too wet, so I just kneaded in more whole wheat flour until it was a good consistency. I also found that I liked them better rolled out a little thicker than the recipe calls for. These would be great cookies to add other flavors too!


Friday, September 18, 2009

Cookie of the Week!- After Dinner Mint Cookies

I don't have a pic this week because we had company and they just went too fast. So you are going to have to use your imagination for this one. I made chocolate wafer cookies from a recipe from the site Smitten Kitten, and used the frosting from the ginger apple cookies. They were super yummy!!!

Here is the cookie recipe:
It says to use a food processor but I don't have one. So I just used my mixer and followed the same directions. It turned out perfect!

Makes 50 to 60 1 3/4-inch wafers. However, I cut my thinner than suggested and yielded more.

1 1/2 cups (6.75 ounces) all-purpose flour
3/4 cup (2.4 ounces) unsweetened cocoa powder
1 cup plus 2 tablespoons sugar
1/4 teaspoon salt
1/4 teaspoon baking soda
14 tablespoons (1 3/4 sticks) unsalted butter, slightly softened
3 tablespoons whole milk
1 teaspoon pure vanilla extract

Combine the flour, cocoa, sugar, salt, and baking soda in the bowl of food processor and pulse several times to mix thoroughly. Cut the butter into about 12 chunks and add them to the bowl. Pulse several times. Combine the milk and vanilla in a small cup. With the processor running, add the milk mixture and continue to process until the mixture clumps around the blade or the sides of the bowl. Transfer the dough to a large bowl or a cutting board and knead a few times to make sure it is evenly blended.

Form the dough into a log about 14 inches long and 1 3/4 inches in diameter. Wrap the log in wax paper or foil and refrigerate until firm, at least one hour, or until needed.

Position the racks in the upper and lower thirds of the oven and preheat the oven to 350°F. Line the baking sheets with parchment paper. Cut the log of dough into slices a scant 1/4-inch thick (I went thinner, closer to 1/8 of inch. If you’re trying to emulate the store-bought wafers, slice as thin as you can, and watch the baking time carefully, as it might be less.) and place them one inch apart on the lined sheets (cookies will spread). Bake, rotating the baking sheet from top to bottom and back to front about halfway through baking, for a total of 12 to 15 minutes. The cookies will puff up and deflate; they are done about 1 1/2 minutes after they deflate.

Cool the cookies on the baking sheets on racks, or slide the parchment onto racks to cool completely. These cookies may be stored in an airtight container for up to two weeks or be frozen for up to two months.

Note: These cookies should crisp as they cool. If they don’t, you’re not baking them long enough, says Medrich — in which case, return them to the oven to reheat and bake a little longer, then cool again.

And the frosting for the middle:

3 oz. cream cheese, softened
2 Tbsp butter, softened
2 cups confectioners' sugar
1-2 Tbsp milk
1/4 tsp peppermint extract
a few drops of green food coloring

Wednesday, September 16, 2009

That Wretched Interloper!

-A word of explanation from Kelly's husband, Adam-

"Hey Gang, You see, we went apple picking this past weekend and I absolutely love apples. Apple pie, apple cider, apple butter, caramel apples, apple cobbler, you get the picture. I've been so enamored with the red and green little buggers and the impending autumnal weather that I've completely bogarted all of the spare kitchen time. Kelly has been toiling away feeding our family and making dinner for guest and whatnot, while I waltz in after the kids go to bed and make a complete mess of the kitchen having fun with baked goods. (and to be quite honest, I'm not the least bit sorry. Need I mention my love for apples once again?) This is the reason for the delay in the Weekly New Cookie Recipe/Review. Now that I have your attention however, here are two of the reasons for delay. A relatively modest apple tart (I give 6 out of 10 stars)


and phenomenal apple cinnamon sweet rolls (a 10 out of 10 if I do say so myself).


The brown sugar mixes with the juices of the diced honey crisp apples and creates a luxurious natural caramel. As for the recipes.... NO DICE! They are mine, all mine! Mwaaa ha aha ha!

Friday, September 11, 2009

Cookie of the Week!- Lowfat Oatmeal Date Cookies


Sorry I'm a little late in the day getting to this, but it has been one of those days! I will spare you all the details, but I had the choice this afternoon to either blog or nap. I chose nap! My camera is acting funny today also so I took the picture using the good old Mac. So these were alright. Not good and not bad. The recipe calls for 3/4 cup of water, and I just think that was way too much. If I make these again, I will try just a half cup of water. I was lucky to come into a huge bag of chopped dates through a mom in my mom's group. She bought a bag at Sam's and her family didn't like it, so my family was the lucky ones to get the bag. Ever since we hosted Middle Eastern students, dates have been a favorite in our house (except for me, I tasted them while pregnant and have never liked them). Adam was super happy about these, and they did go kind of quickly down at the in-laws house this weekend. So here is the recipe: (It calls for raisins also, but I was out so they were just date cookies!)


Low-Fat Oatmeal Raisin Date Cookies
44 min 20 min prep and makes 36 cookies

3/4 cup white sugar
3/4 cup brown sugar
1/4 cup oil
1 egg
1 teaspoon vanilla
3/4 cup water
1 cup flour
1/2 teaspoon baking soda
1 teaspoon salt
3 cups rolled oats
3/4 cup raisins
3/4 cup chopped dates

1. Preheat oven to 350.
2. Cream sugars, oil, egg, and vanilla in large mixing bowl.
3. Add water and beat on low speed until well mixed.
4. Stir in flour, baking soda, and salt.
5. Fold in oatmeal, raisins and dates.
6. Stir until blended.
7. Drop dough by spoonfuls onto a baking sheet sprayed with Pam.
8. Flatten slightly with a fork.
9. Bake 12 minutes or until golden brown.

Friday, September 4, 2009

I think he is slowly going insane

Honey, I know that you are reading this, but I think you may be insane this week. It started out with the idea to ride almost 5 miles on our bikes with all of the camping gear to a friend's house from his parents house. We are dropping the kids off with the grandparents so we can camp with friends and he has this great idea that he and I will bike nearly 5 miles carrying 2 sleeping bags, a tent, a blanket, and clothes. WHAT!

The next thing was yesterday he had promised the kids they could sleep in a play tent if they were good all day. And they were until dinner time. The refusal to eat cause an angry mom and dad, and crying L and D. Needless to say they went to bed in their own beds. At about 11pm dad felt bad and set the tent up in the kids room. Their room is so small, and the tent so big, that you can't really walk around this thing. So he goes and wakes them up so they can sleep in it. L got right in and fell back asleep, D just wanted to stay in her bed. But at 6 am they were up and playing and laughing. This then resulted in angry dad. My thought, which I kept to myself, was well what did you think was going to happen. The tent then came down and everyone finally got out of bed around 7:15 this morning.

I love you dear, but sometimes I wonder about you. Hopefully this weekend your sanity will come back when we are camping in the fresh air!

Thursday, September 3, 2009

Cookie of the Week!-Root Beer Float Cookies

Let me start off by saying this was a FAIL! I was not happy with this recipe. The cookies spread very wide while cooking, the first batch was underdone in the middle and the second batch was over done. I also felt that the root beer candies did not impart enough of a root beer flavor. I think if I were to use a root beer extract instead these might have tasted better! I have had this recipe on my hard drive for awhile so I will have to try and find which book from the library that I got it from. Here is the recipe:


Cookies:
1 cup packed brown sugar
1/2 cup butter, softened
2 cups all-purpose flour
1/3 cup finely crushed root bear candies (about 10)
1 tsp. baking powder
1/2 tsp. baking soda
1/4 tsp. salt
1/8 tsp. cinnamon
1/8 tsp. allspice
2 eggs

Glaze and Garnish:
1 cup powdered sugar
4-5 tsp. root beer or milk
additionally finely crushed root beer candies

Heat oven to 350. Grease cookie sheets with shortening. In large bowl, beat brown sugar and butter with a mixer on medium speed until light and fluffy, or mix with a spoon. Stir in remaining cookie ingredients.
On a cookie sheet, drop dough by rounded tsp. about 2 inches apart.
Bake 8-10 min. or until almost no indentation remains when touched in center and edges are golden brown. Cool 1 min; remove from cookie sheet to cooling rack. Cool completely, about 20 min.
In small bowl, mix all glaze ingredients except additional candies with spoon until smooth and thin enough to drizzle. Drizzle glaze over cookies. Sprinkle with additional candies.


I think this recipe is from this book:

Sweet!
From Agave to Turbinado, Home Baking
with Every Kind of Natural Sugar and Sweetener

by Mani Niall


but I'm not really sure. If you know could you let me know?


Or it was a Betty Crocker cookbook that I can't find the name of. Oh well, you get the idea!

Tuesday, September 1, 2009

Winner of the Cook Book Giveaway is.......

I used the random.org to generate my result and the winner is # 7 Janine!!! Congratulations!!!


I will be sending a cookbook full of the recipes found on this blog along with some of my other favorites. Please respond to me in the next 48 hours to claim your prize.

For those of you that did not win, thank you so much for reading my blog. I am still amazed there are so many of you out there!


Thanks!

Friday, August 28, 2009

Cookie of the Week!!!- Soft Ginger-Apple Cookies

These were an amazing hit!!! The kids gobbled them up and so did the people in Adam's office. The thing that we found out with these, my kids LOVE crystallized ginger! Who knew!! This one comes from the September 15 Woman's Day magazine. I got this one in the mail and just had to make these. Now, I am not a fan of ginger in anyway, but even I loved these. The ginger flavor is a more subtle one, and the yummy apple buttercream frosting helps everything go down. And now for the recipe!

Cookie:

1 stick unsalted butter, softened
1 cup packed light brown sugar
1/2 unsweetened applesauce
1 large egg
1 1/2 tsp ground ginger
1 tsp baking soda
1/2 tsp salt
2 3/4 cups all-purpose flour
1/4 cup finely chopped crystallized ginger SEE SIDE NOTE *
Apple Buttercream Frosting
Slivered Crystallized ginger


Apple Buttercream Frosting:

3 oz. cream cheese, softened
2 Tbsp butter, softened
2 cups confectioners' sugar
1-2 Tbsp apple juice
1/4 tsp vanilla extract


1. Heat oven to 350. Beat butter and sugar for the cookies in a loarge bowl with an electric mixer until fluffy. Beat in remaining ingredients, except flour and crystallized ginger, until blended (mixture will look curdled).
2. With mixer on low speed, add flour and beat just until blended; stir in crystallized ginger.
3. Drop by level tablespoonfuls 2 in. apart on ungreased baking sheets. Bake 10 to 12 min. until tops look dry. Cool on Baking sheet 1 min. before removing to wire rack to cool completely.
4. Frosting: Beat frosting ingredients in medium bowl with electric mixer until smooth. Then beat on high speed 1 min. until fluffy.
5. Spread a rounded teaspoonful of buttercream frosting on each cookie. Sprinkle with slivered ginger. Refrigerate in an airtight container with wax paper between layers.

*Side Note- You can find crystallized ginger at most Asian groceries for dirt cheap, and some grocery stores are starting to carry it. You could always make some yourself, but it would be easier to just buy it. Or become friends with someone that can get some!

Thursday, August 27, 2009

Thank you whoever!

Yesterday in the mail I got a very nice surprise! I received a $100 Meijer gift card from someone as a nice gift. The envelope had my address as the mailing address and the return address, and they both appear to be in different hand writing. The post mark is also from South Bend, so it had to be someone local. I have a few ideas of who it could be, but I guess I will never know for sure. I just want to say thank you whoever you are. You have helped me to buy groceries for the next month and save money to go toward very important bills.

Some day when I am able, I promise to pay it forward!

Again, Thank you!!

Friday, August 21, 2009

Cookie of the Week! Lemon-Zucchini Cornbread Cookies


Okay, so welcome to a new feature on my blog. I am going to do a cookie of the week every Friday (which the people who work with Adam are very happy about, they get leftovers!). I am going to try some new and different cookie recipes. I can tell you what worked and what didn't. If I enjoy myself I will keep this up, but right now my goal is just until the end of September.

For our first cookie I really needed to use up some of the zucchini laying around the house. A bunch of my friends are growing zucchini and are giving them to me, so I have a big pile. Then the newest Everyday Food magazine arrived and lo and behold there was a cookie recipe with zucchini. I wanted to try it. I had to go buy the lemon and cornmeal, but those were not expensive at all. The lemons were on sale for .69 and the cornmeal for a large box was under $3. I had everything else in the pantry. If you are thinking that the cornmeal might be much, just think, now you can make polenta too!

So here is the recipe:


1/2 cup butter softened
1 cup confectioner's sugar
1/2 tsp. vanilla extract
1 tsp. packed finely grated lemon zest
1 tsp. coarse salt
1 cup all-purpose flour
1/2 cup fine cornmeal
1 medium zucchini grated on small holes of a box grater (about 1 cup)

1. Preheat the oven to 325. In a large bowl, mix butter and sugar with a wooden spoon until pale and fluffy. Stir in vanilla, lemon zest, and salt. Add flour and cornmeal and mix until mixture is crumbly. Add zucchini and stir until a thick dough forms.

2. Drop dough by rounded tablespoonful, 2 inches apart, onto two parchment lined baking sheets. Bake until cookies are light golden brown at edges, 25-30 min., rotating the sheets halfway through. Let cool completely on wire rack.

Makes 25 cookies.


Now, this cookie came out without a heavy zucchini taste. I also didn't get the amount of cookies it claims! Not sure what I did wrong to not get that, but oh well! I even got the kids to eat them, and I would consider them some what of a healthy cookie ;-)

Monday, August 17, 2009

Happy 1 year to me!

Well, today is my 1 year blogaversary! I gotta say that I started this thing on a whim and it has turned into something I would have never guessed. I have almost 4,000 hits and those are from almost every continent! I've also met some great new friends through my blog. I have inspired (or so I'm told), and have been inspired. I seriously thought that the only person who would read this would be Adam! Some of my posts that have gotten the most hits have been my baking ones. Awesome!!! I know that these recipes aren't mine, but it seems that I make them easier to find. It might even have been one you were wondering would work. So in honor of my 1 year I have decided to do a fun giveaway! Yes, you read that right! A giveaway. This is different because I am giving away a cookbook filled with all the recipes from my blog and some of my favorite ones that haven't made it to the blog yet. I will be working on this starting today so that way I hope to have it finished by the deadline. So here is what you need to do to enter.

1. Post a comment. It could be anything, hello, what you have liked, if you know me in real life, if you have a request that I make, whatever!!!

2. Get an extra entry if you become a follower.

3. If you post about this with a link on your blog or facebook, you can get another entry! You just need to let me know.

The deadline will be......August 31 midnight eastern time!!!


I will use a random generator to pick the winner and will be announced on Sept. 1.


Starting next week, until the last week in September, I will start a cookie of the week post. Every week I will be making a different cookie and letting you know what worked and what didn't. This was inspired by a internet friend of mine, Heather, who is doing a different cupcake each day in the month of August. Her ideas are amazing! Stop by her blog and check it out. You won't be disappointed.

Wednesday, August 5, 2009

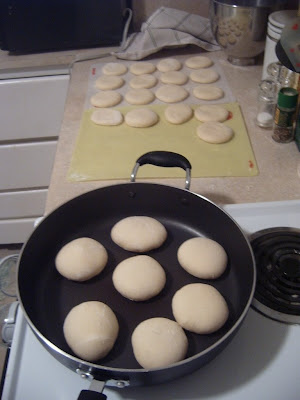
Homemade English Muffins

Adam is obsessed with bread! Any kind of bread! One year he got a bread cookbook, but only recently has started to make the things in it. One day a few weeks ago he decided to make English muffins with the kids. They turned out fantastic!!! They were way better than the store bought kind, but looked just like them. Here is the recipe he uses:


4 cups white bread flour (we have been using all purpose and they turn out fine!)
1 1/2 tsp. salt
1 1/2-1 2/3 cup lukewarm milk
1/2 tsp. sugar
1 Tsp. yeast
1 tbsp. melted butter or olive oil
rice flour or semolina for dusting (again, we have just been using flour)

1. Generously flour a non-stick baking sheet. Very lightly grease a griddle. Sift the flour and salt together into a large bowl and make a well in the center. Blend 2/3 cup of the milk, sugar, and yeast together. Stir in the remaining milk and butter or oil.

2. Add the yeast mixture to the center of the flour and beat for 4-5 min., until smooth and elastic. The dough will be soft but just hold its shape. Cover with lightly oiled plastic wrap and let rise, in a warm place, for 45-60 min. or until doubled in bulk.

3. Turn out the dough onto a well floured surface and knock back. Roll out to about 1/2 inch thick. Using a floured 3" plain cutter, cut out 9 rounds. (We have gotten 2 dozen out of this recipe!)

4. Dust with rice flour or semolina and place on the prepared baking sheet. Cover and let to rise, in a warm place, for about 20-30 min.

5. Warm the griddle over medium heat. Carefully transfer the muffins in batches to the griddle. Cook slowly for about 7 min. on each side or until golden brown. Transfer to a wire rack to cool.


Saturday, August 1, 2009

Silly Faces

One day last week the kids were building towers with blocks. L was so proud of his, he asked me to take a picture. The photo happy mom that I am was very happy to oblige. So I got a shot of the kids with the towers, and then thought it would be fun to get a close face shot of both of them. L did great with his, he loves getting is photo taken. D on the other hand.....


My handsome boy!

She decided to make faces...


until at the end she was laughing so hysterically that she couldn't make anymore faces for me. And when she was done she insisted in seeing them all on the camera. Which then prompted another laughing fit from all. Good times!

Table Project

So after moving into our new cute little house, we realized that there isn't enough room for a dinning room table and chairs. What to do? We had many "discussions" about this. And finally we came up with a solution. We had an old table that I bought years ago for my apartment. It is the height of a coffeetable, and only has 3 legs. We would paint a fun design on it, and attach folding legs on the bottom. This way we can store it folded up behind the couch, and only bring it out when needed. We do have a small closed in back porch that we can stack the chairs up in for more room. Adam got to work sketching out a design. The inspiration was a peacock feather, since those are a reaccuring theme throughout our relationship. I was my turn to scope out some colors and get to work painting. I have gotten a ton done, but have slowed down these last few weeks. I am looking forward to finishing it, and putting it to good use!


Blueberry Picking

The kids and I went blueberry picking at a great local organic farm here in town with my mom's group. My mom was able to come along too! What a blast!!! My kids have never been big blueberry eaters, but give them the ability to pull them off the tree to eat, and watch out! D was just shoveling handfuls into her mouth the entire time we were there. One of the other kids gave L a bucket, then he was so into picking and putting them into his bucket. I froze tons of them, so we have fresh berries all year. But I have made a few things with them too. I made blueberry yogurt Popsicles, muffins, and pancakes. D LOVED the pancakes. The pictures will show just how much she did!


We Moved!


Our old landlords told us that they were selling the house we were living in. They would have given us 2 months rent free to find someplace once they sold it, but I was worried about them selling in the winter. I had been looking on Craigslist and driving around looking for places for 2 months, and nothing was working out. They didn't sell the place, but with 2 small kids, it is too much to worry about when and where you will be moving! On an off chance I drove past this house and the one directly across the street from it. Both were for rent, so I called. D and I went to check this one out because the other didn't allow pets (we have an 8 year old cat). I fell in love at first sight. It is an adorable cottage bungalow just 9 blocks north of our old house. So we were happy to stay in the same neighborhood. It is only 2 small bedrooms, but it has a finished basement. The backyard is perfect for the kids, and it has a garage. The street the house is on is not a very busy street, and it is very quiet here. We had to act fast, the landlord was starting to get 9 calls a day on it. So in the middle of planning a birthday party, 2 birthdays and Father's day, we got a house. We gave 2 weeks notice of our moving and starting packing like crazy. The week we moved it was the hottest so far this year. We have been here a month now, and still love it like crazy! We don't plan on moving for a few years now. And I finally have a good size kitchen to do all my baking and cooking in. All of my stuff fits in with plenty of work space! I'm in heaven!!!

Related Posts with Thumbnails