Monday, January 16, 2012

Easy Birdfeeders

I don't know about you guys, but this is the time of year that our minds wander to our feathered friends in the cold winter months.  And if like me, you have tried to do the old peanut butter, birdseed and pine cones. The kids have such a hard time spreading the peanut butter over the pine cones, and it is so messy pouring the birdseed every where. Last year, I tried to make it as mess free as I could think of. We had the kids spread the peanut butter on mini bagels that I had a yarn looped through the hole. We then put it in the snack size and had the kids sprinkle the birdseed into that. While that worked pretty well, when I saw this idea from pinterest I knew I had to try it this year!!!

Supplies needed:
small bowls
pipe cleaners
Cheerios

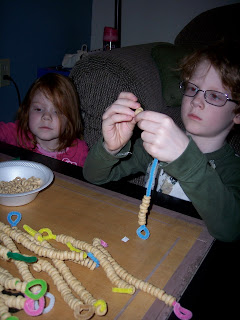
This was probably the most simple craft we have done so far! I did this in the morning with the kids in the moms group I run, but forgot my camera. Plus, L saw me getting these ready and pleaded that I let him do it after school that day. The first thing that I did was wrap one end of the pipe cleaner around one of my fingers, and then twist it to hold that shape. Pour some of the Cheerios into the bowls, and show the kids how to thread them onto the pipe cleaners. When they get to the end, let them know they need to leave a little space at the bottom, and fold up the pipe cleaner to secure all the Cheerios on the pipe cleaner. That is it! My kids ended up making a ton of these, and we headed out to put them on the trees. Of course it was dark by then, and snowing, but fun none the less!


 Look at that pile of pipe cleaners!

 Cheesy little D just had to get in the picture!
 There are only a few trees short enough for the kids to reach in our apartment complex, so this little tree got the most!

Books we read:
Curious George A Winter's Nap by H.A. Rey
Under and Over the snow by Kate Messner
Hooray for Snow by Kazuo Iwamura
Here Comes Jack Frost by Kazuno Kohara
Thursday, January 5, 2012

Penguin Appreciation

Every Jan. we have a penguin appreciation day, and usually it is frigid temps. This year, the weather is not too bad. Our crafts for this year's play date come from Totally Tots and Crafty-Crafted. Normally I would do a themed snack as well, but ran out of time. I wanted to make some penguin shaped cookies or have goldfish crackers. Oh well, maybe next time.

Supplies needed:
black construction paper
white construction paper
orange construction paper
glue sticks
toilet paper tube
googly eyes

This was one of the easiest crafts to put together. To make it even easier, I put all the pieces the kids would need, along with a glue stick in a plastic sandwich bag. That way, when I pass it all out, each kid got a bag and a white piece of paper. Way easy!!!


L working by himself of the penguins. The hardest part was gluing the black paper to the tube. The other blog uses paint, but we were in the library and that was not an option.

D not needing any help from anyone!

Books we read:
365 Penguins by Jean-Luc Fromental
I am Pangoo the Penguin by Satomi Ichikawa
Penguin Pete by Mark Pfister

I is for Igloo

The night we did the baked cotton ball experiment, we also did this fun igloo craft from Kimboomu!

Supplies needed:
Blue construction paper
strips of white paper
glue stick
kid scissors
black marker

I started by drawing a simple igloo shape on the blue paper. I gave each kid some strips of white paper and told them to cut it into block like shapes.  We then took the white "blocks" and glued them to the igloo shape. L and I took the simple approach of starting at the bottom and working our way up. D on the other hand, placed the glue blocks all over the place with no pattern. Once she saw how ours looked, she tried to start making a better pattern. It was a simple and fun craft to do, while waiting for Daddy to get home!


Cutting the blocks

Making a nice pattern

D and her total chaos!

Baked Cotton Balls

I thought we should throw in a science experiment this week as well. Once again, a pinterest find! This one comes from Play Create Explore, and she has a great step by step, so I won't repost that one.  This one was super easy to pull together, and an added bonus, you probably already have everything you need at your house, and if not, head over to the dollar store for supplies. One thing I will add, maybe put newspaper down, or a wipe-able tablecloth before you begin this project. Also have washcloths wet and at the ready to wipe up any hands. Both kids loved putting the cotton balls into the flour mixture, and totally covering them.

We did make some observations when we were done coating them. When we put them in the oven, will the outside stay soft and mushy or will it get hard and crunchy? Will the inside stay soft and fluffy or will it melt away?

They baked while we ate dinner. After dinner, we had the cooled tray at the table, and we all grabbed some cotton balls to break open. I would say that the cotton balls that were pushed up to the side of the pan or touching each other could have been baked longer. The cotton balls that were by themselves on the baking sheet got nice and crunchy. Both kids and adults had a fun time breaking them open and pulling out all the cotton that was inside.


We HAD to have blue and red. Big shocker!

Dipping the cotton balls in the coating


L wasn't too sure what to think at first.

D was pretty happy, as always.

One of the finished, cracked open cotton balls!

Frosty Pictures

We did this craft the same day we did the salt watercolor craft. We were just having way too much fun! This was another one I saw on pinterest, but again, had heard about for some time. This time, I found the step by step on Brimful Curiosities.

Supplies needed:
Blue construction paper
crayons
brushes (we used foam ones)
small bowls
Epsom salt
boiling water

Start by measuring 1/4 cup salt and a 1/4 cup boiling water, and mix until salt dissolves. While waiting for that to cool a bit, have the kids draw pictures with the crayons. I told them to pretend this was a window looking outside, and what would you see outside in the winter.  When we were done drawing, I poured the salt water into 3 small bowls. I showed the kids how to dip the brush into the water and totally cover the paper. Once the entire paper was coated in salt water, we put them on top of the dryer in the laundry room to dry. When they dry, you should see crystals form, and look like ice on the window. We discovered that my picture, with the least amount of water, just looked slightly icy. While L and D, put more water (puddles in places), had more larger crystals. Our crystals started to show just an hour after we painted on the water. After a few hours, they were mostly dry. The kids really thought it was neat to see all the different looks of the salt crystals on the pages!


D hamming it up for the camera

L, deep in thought about his drawing

My snowman

Starting to brush the salt water over my drawing


D also drew a snowman, and L drew a snowball fight!


Painting away!

The start of the crystals on L's paper

D's frosty looking snowman!

Salt and Watercolor painting

We finally got a decent snow here in Northern Indiana, and it felt great! So I thought since L is still on break for a little bit longer, why not fit in some crafts! We were way too busy during the month of December to do much, but I think Jan. will be a bit better. This is one of those crafts that has been floating around pinterest, and that I have heard about for sometime now. Now was the perfect time to do it. I found the basic step by step at Housing a Forest.

Supplies needed:
heavier paper (we used sketch pad paper)
Elmer's glue
A can of table salt (found at the dollar store!)
watercolors (either liquid or regular)
small paintbrushes
baking sheet
paper towels
small bowls of water

I set this all up on our kitchen table. I had a sheet of paper, brush, watercolors, paper towel (for drying off brush in between colors), small bowl of water (for cleaning brush in between colors), and glue for each person doing the craft. I showed the kids how to lightly squeeze the glue and to "draw" a picture on the paper. When we were done drawing, we put each paper, one at a time, on the baking sheet. I let the kids shake the salt all over their drawings, and then shake the extra off the page. I made sure to have the watercolors prepared and ready to go. Adam suggested to make it easier, to spoon a good amount of water into each color to make it easier, and it really did! I showed the kids that all they had to do was fill their brush up with paint, and VERY lightly touch it to the salt. The salt then grabbed the paint, and spread it out. I wish I had a picture of their faces when they saw that happen for the first time. There were lots of yells of, "wow", and "oh man"! Now if you are doing this with older kids you can use this as a science experiment as well, and talk about why and how the salt carries the water. But since mine were a little too little for that, we skipped it. When you are all done, find a nice place out of the way to let them dry. In our house it took almost 1 whole day. We now have them hanging on the wall by our back window and it seems to just brighten the whole room!

Drawing out our design

D shaking the salt on her picture

Starting the paint on mine

D loves color, so hers is very rainbow colored!


L was trying to make sure his colors were very true to life. The sky had to be blue, the boy had to be peach. He even mixed his yellow and orange to get the right color.

D's picture. A pumpkin in the grass

L's blue sky


Our finished pages on the wall.
 

Sunday, January 1, 2012

Winter Solstice Party

We held our annual Winter Solstice Party this week at the library. We thought that after the holidays might be a better time, and more people could join us.  This year we did a snowman theme. We had crafts, snacks, a game, and stories. The snack that I brought were baby carrots (noses), pretzel sticks (arms), and mini mint oreos (coal for eyes).

The first craft that we did were snowman masks.

Supplies needed:
paper plates
white cotton balls
black, orange, and red construction paper
elmers glue
popsicle sticks

I started by cutting out all the noses, eyes, and hats out of paper. I then cut the middle out of a paper plate for the base of the mask. Start by gluing the hat in place, that way you have a better idea where to put your cotton balls. Then start gluing the balls down. I used 9, and spread each out a little bit before gluing down. Then add the eyes, nose, and stick to the back!

 This next craft I saw on pinterest.com.
 Supplies needed:
 sheet of blue construction paper
 markers
 Elmers glue
 mini marshmallows

We started by "drawing" the snowman shape on the paper with the glue. The kids then had a blast picking out marshmallows from bowls, and gluing them to the shape. When the glue is all covered, let the kids use the markers to add the snowman's features like hat, eyes, nose, mouth, or arms. Let dry for a few hours!

 This game that we played was a BIG hit with all the kids and moms alike. Also spotted on pinterest, we made one to go with our wintery theme. All the supplies were found at Dollar Tree!
Supplies needed:
plastic bowls
 tissue paper (in whatever color theme you have, we used white with silver stars and silver)
 Elmers glue
 prizes (we found gold and silver beaded necklaces, and mini wedding bottles of bubbles)
 something to glue the bowls to, and let stand up (we covered a folding table with paper and glued them to the paper.)

 Start by laying out your tissue paper. Lay the bowls open side down on top of the tissue, leaving about an inch space between bowls. Place prizes on the inside of the bowls. Now, lift one bowl at a time, put a thin line of glue along the rim of the bowl, and carefully set back down over the prize onto the tissue paper. Let dry for a few hours. Trim off the tissue to however close to the bowl you wish, and let dry totally. Once finished drying, you can glue your bowls to whatever stand you choose. We used a table, but a sturdy cardboard box would works also. I had the kids line up from smallest to tallest. Each kids got to punch open a bowl and grab whatever prize was in there. (I put one of each prize in each bowl)


Books we read:
Perfect Soup by Lisa Moser
Snowmen all Year by Caralyn Buehner
The Snowman Band of Snowboggle Bend by Cheryl Hawkinson

Finished Advent calendar

 Well, Christmas has come and gone. Can you believe how quickly that came up this year? I know I sure can't. Now we get to come off of what I like to call, The Christmas let down. Where we just hang out at home, relax, eat bad foods, and play with our new stuff. It is also a time to reflect on the last month. I know in our house, we have all been super busy. I didn't get pictures of most of our Advent calendar things, but I did want to post the list of things that we tried to do. We didn't get it all done on the day we said, nor did we get all of it done in general, but I think we did a good job trying.

1- Read Christmas books
2-Watch a Christmas movie
3-Cupcakes and cocoa with friends
4-Put up the tree
5-Make coffee filter snowflakes
6-Make peppermint play dough
7- Set up Nativity set
8-Craft day
9-Watch another Christmas movie
10-Make ornaments for the tree
11-Dinner with friends (turned into movie, cookies, and cocoa with friends)
12-Make holiday cards
13-Make gingerbread men
14-Go shopping for each other
15- Bake cookies
16-Decorate a Gingerbread house
17-Go to Chicago
18-Do good deeds
19-Deliver gifts to teachers
20-Make reindeer food
21-Craft day
22-Wrap gifts
23- Drive to see lights
24- Set out cookies and milk for Santa
25- Christmas Day!


 Decorating our Gingerbread men
 Tree day! Frosting cones and putting candies on them!
 D showing me that she was eating more than decorating.
 L enjoying his lavish seat in the rented car we took to Chicago
 D was too busy coloring with her new crayons to notice much of anything.
 Watching the ice rink in Chicago


 Our nephew was baptized the week before Christmas and we were the Godparents!
We also got to see all the immediate family members for Christmas, help in L's school for the party, go to an indoor Water park with friends,  play in the little snow we got, and ring in the new year with some close friends. What a fantastic way to end the year. Hope you all have a happy, healthy 2012!

Related Posts with Thumbnails