Sunday, April 14, 2013

Mixed Media Spring Mural

While checking Pinterest for some fun Earth day projects, I came across this fun mural. Originally done as a photo of the day on the Phillips.family blog, I figured it would be the perfect project to work on today. You see, it is suppose to be spring here in Indiana, and in typical Indiana fashion, it is cold and rainy with light warmth in sight. D and I figured if we made a wonderful flower mural, then maybe, just maybe, it would encourage Mother Nature to share some sun and warm weather on us in the next few weeks.

The original post only had a picture, so we made things up as we went. We didn't have the cardboard or brown paper that the original had, but we do have the Ikea paper roll. I can't say anything but wonderful things about this paper roll! We normally use it on the Ikea easel that we have had for many years now, and has been used for chalk, dry erase markers, washable markers, crayons, colored pencils and paint!

Supplies needed:
large piece of paper
tape (we taped down our paper to make it easier) *optional
brown, green, and blue paint
paint brushes
tray (we re-used a foam tray from some produce)
green paper
scissors
tissue paper of all colors
glue sticks and Elmer school glue
cotton balls

Our first step was to paint brown dirt along the bottom of the paper. This was D's idea. She thought that since we didn't have the brown paper like the picture, then we needed to add the brown ourselves. So we painted just a small strip of brown along the bottom.

 Next step was to paint the green grass. I figured that we would just paint a strip like we did for the dirt, but D had other ideas. She insisted that we paint points to the grass. Sure, why not! In the end, I do love how it looks better.

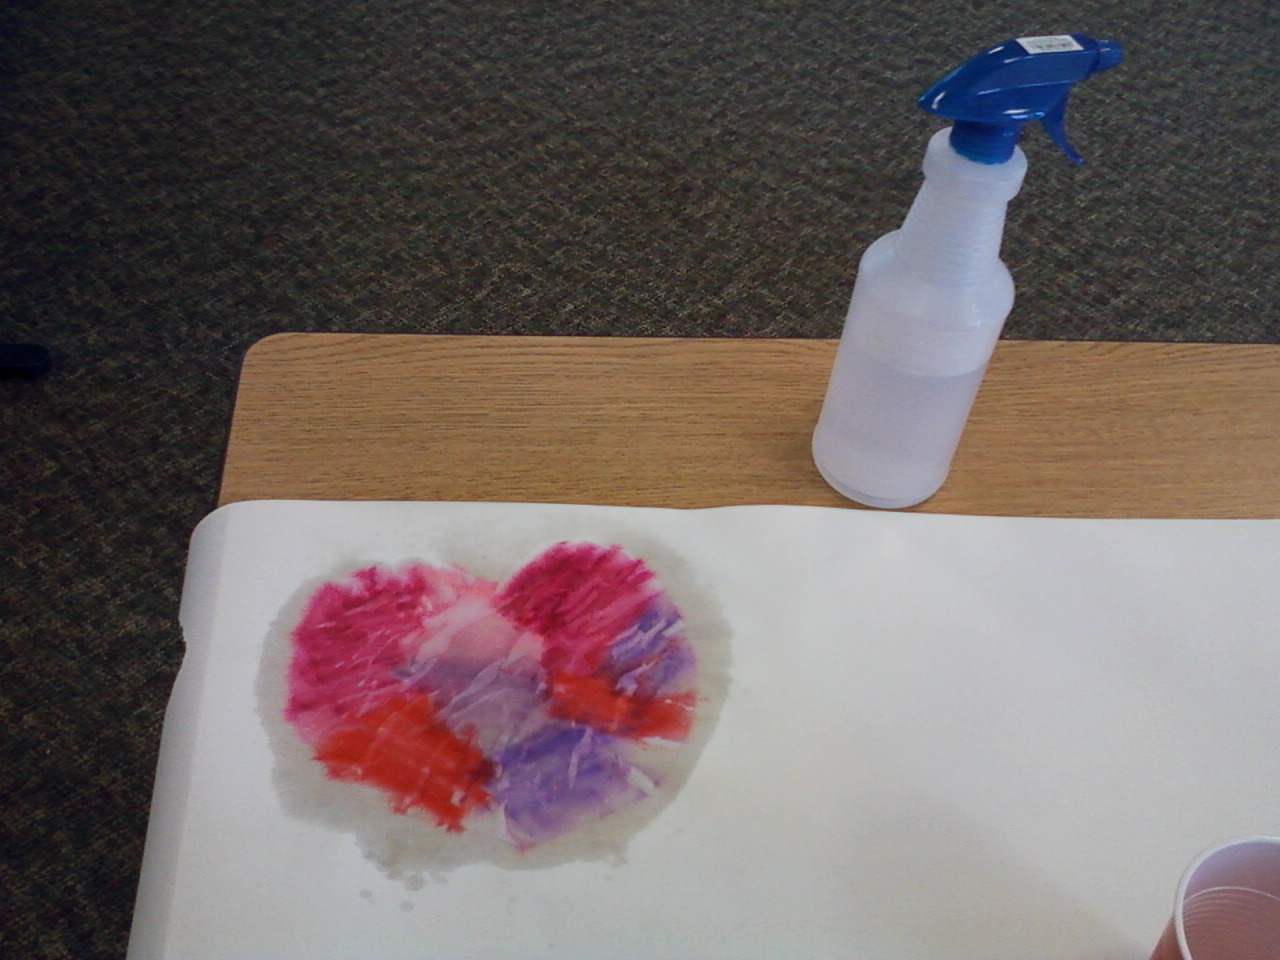
When the grass was done, and while the paint was drying, we sat on the floor and cut long strips of green paper for the flower stems. D said she didn't want long ones, but I did. So we ended up with all different sizes of stems. Worked out great! We then dug through our tissue paper box, looking for fun flower colors. There were dark blue, light blue, green, pink, purple, red, yellow, and orange! We just cut small squares and then crumpled them a bit. The paint was mostly dry at this point, and we decided that instead of gluing the stems down, it might be best if we paint the sky so that way we knew how tall to make the stems. We painted a nice size strip of blue at the top, making sure to not have a straight line, since "the sky is not straight". D started to add rain drops, but when I reminded her that we were trying to keep the rain away, she changed her mind. While the blue sky was drying we got to work on the stems. We used all different sizes for the stems. Once we were happy with how many stems there were, we used the school glue to add a drop at the top of each stem. Then just squish a small ball of tissue paper to it, and you have spring flowers!

By the time we were done with the flowers, the sky was dry, so it was time for the big fluffy clouds! In the picture they just glued down the cotton balls in groups, and painted around them. I asked D if she wanted to do it like that, or if we should pull the balls apart and fluff them up a bit. She thought we should do both, so we did!


I am really happy with our finished mural! I really can't wait for it to dry totally so we can hang it up on the wall. We had a great time making it, and D was so excited to show Daddy and L. It was a simple, relatively mess-free craft!

For some fun Earth Day ideas, check out what we did last year! http://kellyheet.blogspot.com/2012/04/earth-day-crafts.html


Thursday, April 11, 2013

Blooming Flowers!

I had the great fortune to be included in the Little Indiana Quarterly Magazine once again! This time the theme was spring. One of my favorite seasons, not too hot and not too cold normally.  Adam and I brainstormed for an all new craft idea. Together we came up with this fun one.

Supplies needed:
toilet paper tube
green paint
paint brush
tissue paper in fun bright colors
scissors
green plastic straw (found in the Meijer kitchen department)
brass brad fastener
glue stick
brown, green, and orange construction paper


We started out by having flower shapes pre-cut out of the tissue paper, small circle out of the orange paper, seed shape in the brown, and leaves shapes in the green.  Have the kids paint the top edge of the tube with the green paint, this will be the grass.


Each kid picked 3 flower shapes, stacked them on top of each other, glued the orange circle to the middle, and attached them all together with the brass brad.


We then glued the leaf shapes to the green straw. We started with 2 separate leaf shapes, but that didn't work well. So we re-cut the leaves with a section where they are connected in the middle. This makes it easier to glue onto the straw.


Now to glue the seed to the brown part of the tube under the grass. This gives you a chance to talk about how plants grow and what they need. :-)  Make a small slit in the top of the green straw and insert the brad with the flower attached. Roll the flower, and leaves up, and slide inside the tube from the top down.


Now slowly push the straw up and out pops the pretty flowers! You could always staple the bottom of the straw to the bottom of the tube to create a stand, or do what I eventually did, gather all the flowers on the straws and put them in a vase. That way you can have pretty spring flowers that the cat won't eat!


To buy your copy of Little Indiana: Spring Edition

Wednesday, February 20, 2013

President's Day Crafts

It's President's day again, and both kids had the day off from school. We had been reading some great books for about 2 weeks before. We stuck with George Washington and Abraham Lincoln this year. These 3 crafts were simple, easy, and use things that most people already have in their house!


The first one was a very simple Honest Abe. Originally found at Chalk Talk. I drew the basic shape out on just white construction paper. Just let the kids have at it with basic crayons. I love how they all came out slightly different and slightly the same.


This was a very fun Washington craft! Found on The First Grade Parade . They also had the kids do a writing prompt, which I wanted to do, but ran out of time. Start with a paper plate cut in half. To make the perfect skin tone for this craft, just mix a little orange in a blob of white. While the paint is drying, cut out the hat from blue construction paper. When all is dry and ready to go, add cotton balls for his wig and let the kids draw on his face. D made sure to add his false teeth and tongue!


I found this finger puppet craft last year and ran out of time. So I thought it would be great to try it this year. Originally found Kaboose and marked as for 4 years and up, I would say that even my very crafty 5 and 6 year old had trouble with this one. Made from just construction paper, tape, and coins, the kids had trouble rolling the paper and taping at the same time. With a little help from me, we were able to get it in the right shape. From there on out, I let the kids embellish them however they liked, and we had no more problems. Later in the day, the kids both put on a show using these little guys.
See what other fun crafts we have done in the past!
2012: President's day crafts
2011: President's day


Monday, February 11, 2013

Chinese New Year 2013

We love celebrating all the holidays we can, and Chinese New Year is one of them! We have done this now for many years. This year is the year of the snake, so we had to make a snake! We had crafts done in the morning, and then picked up some take out from our favorite little place. We had egg drop soup, pork egg rolls, pork fried rice, and fried dumplings.


I always have a decent stash of toilet paper tubes around the house because you really never know when they will come in handy! As soon as I saw this neat snake, I knew the kids would love to make it. Found here on Cheap Crafty Mama, we did things a little differently. We all took turns painting the sections, we used brass brads to hold him together, and L used a black bingo stamper to give him his wonky eyes. This turned out so cute, I think he might have to be left out for some time.

Last year we attempted paper lanterns, so this year I wanted to try something a little different. I saw these Good Fortune banners on Dim Sum, Bagels, and Crawfish.  She has a link to a step by step on how to make the characters. We had so much fun working on these, and they look so pretty!


2013 Valentine Craft day

This year we did our craft day a little differently. This year, I am no longer in the local moms group because we aged out with school. It makes me a little sad because we spent so many great years involved with it, that I figured we still needed to have a big craft day. So I got a room at the library for after school, and invited a bunch of our friends to join us. It was a huge success! I set up 4 crafts in different stations, and had everyone bring a snack to share. It worked out so well, that we are planning a St. Patrick's day the same way.


One of the craft the kids could make were heart sun catchers. I had hearts cut out of contact paper, construction paper heart frames, yarn, and tissue paper all pre-cut.


We did add 3 stories to the end of our craft time.

We also did one of our favorites. These always come out so nice looking! I cut the plain coffee filters into heart shapes and set out Valentine colors of washable markers. We encourage the kids to color in the entire filter.
 We then had the kid move down the table a bit and spray down the filter. This creates a fun tie dye effect. Always a fun craft!


 We did marble painted hearts. I had to come up with a way to do this and minimize the mess potential since it was in the library. A friend had donated these empty coffee cans to the Art Smart program at school, so I borrowed them for the afternoon. I had medium sized hearts cut out of white card stock. We only used red and purple paint, which still created some fun other shades after it was all done. I put the paint and a few marbles in a separate cup and used a plastic spoon to add them to the coffee cans. I made sure the lids were on tight, and the kids LOVED shaking the can and making loud music.

 And lastly we did the love birds that my kids and I had done a few years back as a fun and simple fourth craft. I had everything all pre-cut just making it easier, plus I knew that I didn't have enough kid scissors for all that were coming. This was fun to see how the kids really made it their own!


Monday, January 28, 2013

Pinterest Inspired Kid Crafts!

The kids and I love to do crafts, but now with school and all our other things, we seldom get to do any. So with yesterday being a nice, relax at home day, we busted out supplies. We checked out my Pinterest boards and pulled some ideas out. We finished 5 crafts, and got 1 started that will be finished today.


The first craft was this cute mug of hot chocolate craft from Melissa and Doug! They have this nice free printable and directions on how to do it. We did add the real hot chocolate mix to our mugs, and the kids insisted on using real mini marshmallows instead on the ones provided on the print out. I did use a heavy card stock to print this on. It helps to hold up against the mix and marshmallows.


Next up, our 100th day of school is coming up this week, and I find that any fun way to teach counting up that high is very welcome! This one comes from the blog For The Love Of Kindergarten but sadly the link no longer goes to a post. So I will link to the pin instead.  This was super easy! On heavy white card stock, I free hand drew the 100 in the middle, and using a ruler, drew lines making 10 sections. I used 5 different colors of paint (so use each color twice), we dipped q-tips into the paint and made 10 dots in each section. The kids then asked if they could paint in the 100, and we said, "Sure, why not!" They both though this was a fun way to count by 10's all the way to 100!

This very cute penguin craft was picked out by L. Super easy, and very fun! This one comes to us from Reading Confetti.  I used some bowls from the kitchen to use as tracers for all of the pieces. I used a white colored pencil to trace on the black paper, and let the kids all cut out all their own pieces. We then set them the way we wanted them to look, and got to gluing. We had extra paint left from the 100 craft, so we used that for the eyes. For other penguin craft ideas, check out what we did last year.


Last year for the 100th day of school, L wanted a special shirt to wear. I found this cute monster one from Simply Modern Mom! So of course we needed to copy it. ;-) Well, now that D is coming up on her first 100 days of school, she needed a special shirt to wear as well. We came up with a gumball machine that had 100 pompom gumballs glued on. Adam used Sharpie markers to draw the image on the t-shirt, and I used fabric glue to attach the pompoms or googly eyes to the shirts.


Wednesday, January 16, 2013

Free Fun Science Event!

All Indianapolis readers! Are you looking for a fun thing to do with the kids this Saturday?


Lakeshore Learning Store Science Fair!
Date: January 19, 2013
Time: 11am – 3pm
Location:  1300 E. 86th Street, Indianapolis, IN 46240
Event Details:   Calling all little scientists! Join us at Lakeshore Learning Store’s Science Fair for a fun-filled afternoon includinghands-on activitieslive science demonstrations and experiments for kids! Plus, children can also participate in a special
craft activity and get a FREE Science Software* with any in-store purchase during the event/while supplies last!
Cost: Free/ Open to the public

Some activities include making and decorating your very own Thermometer as well as Magnet Activities, Observing & Magnifying Activities, Exploring Simple Machines and Exploring Hot & Cold with volcano demonstrations and snow play!


Have fun, and please let me know if you go and what your favorite thing was!

Related Posts with Thumbnails