Showing posts with label fall kids crafts. Show all posts

Monday, October 21, 2013

Halloween crafts Part 1 2013

We have been really inspired by some great crafts this year. Here is a taste of what we have been up to!


Fall Leaves

Origami Spiderwebs

Yearly Candy Corn Hand prints

Sponge painted Bats

Glue and Chalk Spider webs

Princess Leia buns


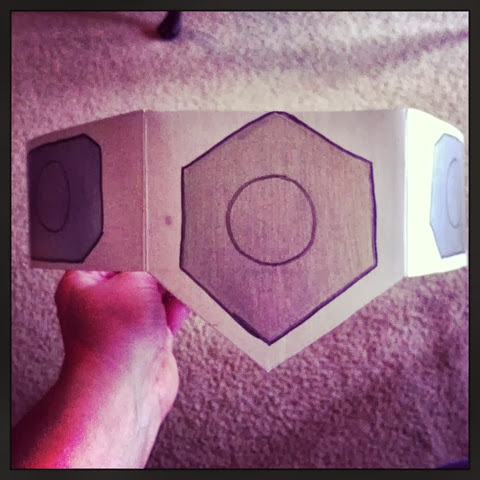
Princess Leia belt

Boo S'mores
Inspiration found from these wonderful blogs for all these crafts!
Fall Leaves
Spider Web Origami
Candy Corn Hand prints
Bats
Pastel Spider webs
Princess Leia buns
Boo Smores


Fall Library Fun! September

As many of you know, either by talking to me in real life or reading the blog over the years, we LOVE the library!!!! We are so very lucky to have 2 amazing library systems. They are always hosting free functions for the entire family, monthly book sales, free meeting rooms, and a huge selection of books, movies, music, and magazines. We did tons of fun activities over the summer through the summer reading program, and now they have some amazing fall age appropriate events as well. This year, since the kids are older, we have been able to sign up for the Magic Tree House Reading Club, a Science Club, and L gets to go to a Lego Club. All these are free and occur just 1 per month!


The month of September we read Midnight On the Moon. They got to watch the youtube video of the first man on the moon, and then they made craters. The librarians had 2 tubs full of flour. The kids each got to pick a ball of various sizes and materials, and drop straight down into the flour.

What they were left with looked just like craters on the moon!!


L had his first Lego club in September. He was very excited to see some old friends, and meet some new friends. They were split into groups, and allowed to build whatever it was they wanted. They also had some Lego themed books out for check out, and taught them the rules to follow that spelled out the word LEGO.


We also have signed up for a fun Science Club. In September we explored how and why leaves change colors. The librarians had tons of different leaves laid out on the table. They started out by having each kid tear up a leaf into tiny pieces and then grind it up in a mortar and pestle. They added it to some rubbing alcohol and put it in a water bath. Later they added some litmus paper to see the colors make their way up.


They also had a microscope set up with various leaves on slides for them to explore. They also did a fun craft that we had done in the past. They painted a tree with a brush, and then using a q-tip, painted leaves in fall colors on the trees.


And last but not least, a Fancy Nancy Tea Party!

Friday, October 5, 2012

X-ray hands

Welcome to Day 5 and the last day of the Hoosier Horror Blog Hop! This is a craft that I spotted on Pinterest and just knew I had to try it! This one comes to use from Inspired Montessori and Arts.

Supplies needed:
Black construction paper
Elmer's glue
white chalk
Q-tips

I had each child trace their own hand with the white chalk on the black paper. I then showed them how to draw a line with the glue and lay the q-tips on top of it, to make it look like the bones inside our hands. They really liked this! I did have to cut a few with the kitchen shears, but L discovered that if he bent the q-tip twice, they snapped right where he needed it to be. These look nice and creepy for our Halloween display, and they were really easy!


Tracing hands


The kids were really excited that these really did look like bones in the hands!


Thursday, October 4, 2012

Monsters!

Welcome to Day 4 of the Hoosier Horror Blog Hop! Today's project was something that I came up with totally on my own. I think this turned out great, and I plan on doing it with the kids next year as well, to see how things change.

Today we are using a fun supply called bleeding tissue. How appropriate for Halloween, no? This is not your normal tissue paper that can be found in the cards section of the store. This is a special kind of tissue paper meant to "paint" when wet. This can be found at most art supply stores. We used it before on an Earth day craft!


Supplies needed:
white construction paper
bleeding tissue
spray bottle with water
pencils
black Sharpie Markers
scissors
markers
googly eyes

You will want to lay down some paper or towels over your work surface. This stuff will stain the table. I put down some pages torn from a magazine. I told the kids to rip shapes from the tissue paper and place around their white construction paper. You want it to be somewhat covered. When they were done, carefully spray the paper with water. We let this dry overnight. Next I gave the kids another piece of paper, and a pencil, and told the kids to design their own monsters. This was neat to see what they made. I had them cut this out, this will be used as a stencil. The next day, we removed all the tissue paper from our pages, and traced our own monster stencils with the black Sharpie marker.  We cut our monsters out and set to decorating them. I had googly eyes of all sizes, and markers of all different colors. D even got out a bingo stampers to give her monsters spots/chicken pox. These little guys are now hanging up next to our dinner table!


My tissue all laid out

After spraying it with water


D's designed monster

L's designed monster

My monster all traced and ready to be cut out


Our fun and scary monsters!


Wednesday, October 3, 2012

Halloween Banner

Welcome to Day 3 of the Hoosier Horror Blog Hop! I hope you are enjoying these posts as much as I have enjoyed getting them ready for you all. This post was inspired by a banner that Organize Your Stuff Now did last year.  I had pinned it last year with all intentions of doing it, but time got away from me. This year, I had a quiet morning to myself, and motivation with this blog hop, to get it done. Originally I had intended on making this day's post about our fall bucket list, but realized that I did the exact same post already last year. Oops!

This was a fun craft for mommy, but the kids could easily do this one as well. In fact, as soon as the kids came home from school, they noticed it right away. D even was sad when I didn't have her do the craft, so it looks like I may have 2 of each of these by the end of the week.

Supplies needed:
ruler
pencil
scissors
glue stick
green, white, black, orange, and brown construction paper
markers (I used Sharpies)

I first decided which characters I wanted to make. I knew that I had to have a ghost, Frankenstein's monster, and a bat. The original post had made these as triangles, but I liked the rectangle better. I made mine 5"x7". There really are not any other instructions other than cutting out the shapes you would like for each rectangle, and gluing them all together. For now, I just used a small bit of masking tape on the back of each character and taped them directly to my "mantle" shelf. I think of the next week, I will transfer them to some yarn and string it up under the shelf. I may add more as the month goes on, we shall see.


Frank and Pumpkin

Upside down Bat, and Candy Corn

Ghost

The whole crew on the shelf


Tuesday, October 2, 2012

Chalk Fall Leaves

Welcome to Day 2 of the Hoosier Horror Blog Hop! Today we are talking about a super easy but fun craft! Chalk drawn fall leaves!

This post had been inspired by an Inner Child activity that she did a while back, but I put my own spin on it. While shopping at United Art and Education for some Art Smart supplies (more on that later), I saw this great little book by Dover of leaf stencils for under $2! I just knew we needed to get it. There are so many things we can make using this. While, on the drive back home, I got to thinking. Why not use chalk and the stencils and make a similar page to Inner Child's.

Supplies needed:
white construction paper
fall leaf stencil (if you can not find this, you can either make your own using photos printed off the computer, or real leaves!)
q-tips
chalk in fall leaf colors

This craft is a very simple and not very messy craft. I had the kids sit at the dinner table, and pick out a leaf stencil. I showed them how to trace the leaf, using the chalk, and leaving a thick line. Now using the q-tips, just make straight lines from the chalk line out. It will give it a nice smudgy look to it. It took the kids just a bit to get the hang of using enough chalk to create this look. But both kids really had fun. They were amazed at how it looked when we were all done. These pictures are now hanging up and decorating our entry hall walls.


Tracing a leaf


 My finished page, I really like how this looks!


Smudge away!


Related Posts with Thumbnails